1. Barbell Overhead Press
Set the bar up in a squat rack or cage, and grasp it just outside shoulder width. Take the bar off the rack and hold it at shoulder level with your forearms perpendicular to the floor. Squeeze the bar and brace your abs. Press the bar overhead, pushing your head forward and shrugging your traps as the bar passes your face.

Set the bar up in a squat rack or cage, and grasp it just outside shoulder width. Take the bar off the rack and hold it at shoulder level with your forearms perpendicular to the floor. Squeeze the bar and brace your abs. Press the bar overhead, pushing your head forward and shrugging your traps as the bar passes your face.

2. Standing Dumbbell Fly
Hold a dumbbell in each hand by your sides. Without shrugging, use your upper body to swing the weights up a few inches. Your arms and torso will form an upside-down V shape. Think of it as a lateral raise with momentum but without full range of motion.

Hold a dumbbell in each hand by your sides. Without shrugging, use your upper body to swing the weights up a few inches. Your arms and torso will form an upside-down V shape. Think of it as a lateral raise with momentum but without full range of motion.

3. Face Pull
Attach a rope handle to the top pulley of a cable station. Grasp an end in each hand with palms facing each other. Step back to place tension on the cable. Pull the handles to your forehead so your palms face your ears and your upper back is fully contracted.

Attach a rope handle to the top pulley of a cable station. Grasp an end in each hand with palms facing each other. Step back to place tension on the cable. Pull the handles to your forehead so your palms face your ears and your upper back is fully contracted.

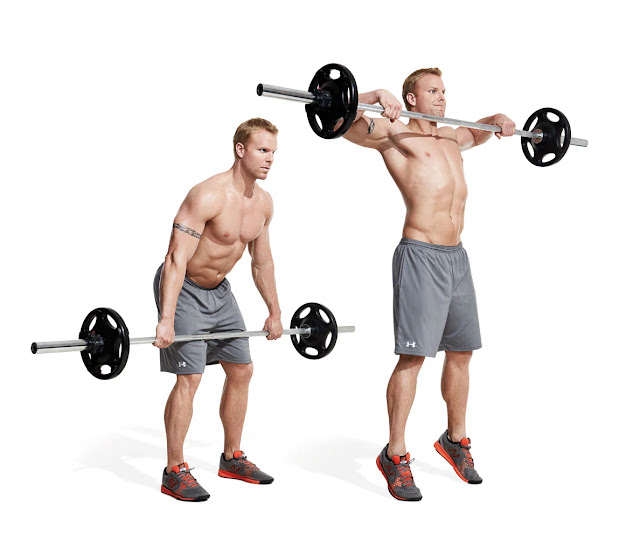
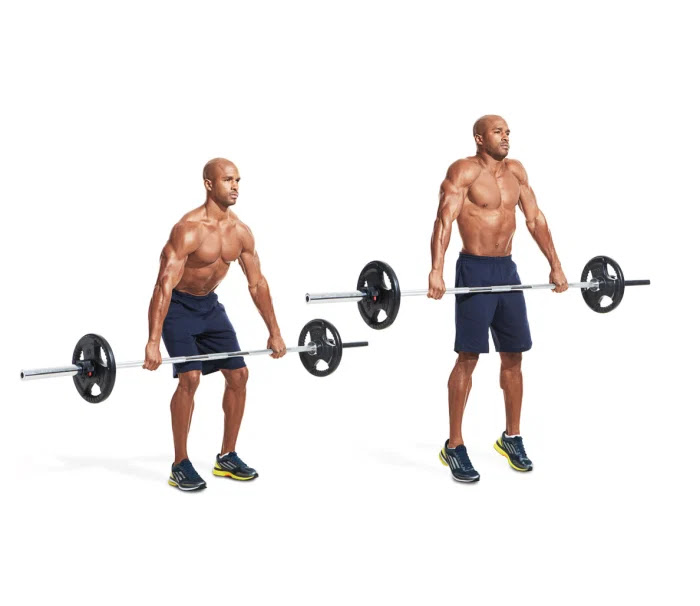
4. High Pull
Grasp the bar with hands about double shoulder width and hold it in front of your thighs. Bend your knees and hips so the bar hangs just above your knees. Explosively extend your hips as if jumping and pull the bar up to shoulder level with elbows wide apart, as in an upright row.

Grasp the bar with hands about double shoulder width and hold it in front of your thighs. Bend your knees and hips so the bar hangs just above your knees. Explosively extend your hips as if jumping and pull the bar up to shoulder level with elbows wide apart, as in an upright row.

5. Seated Dumbbell Clean
Hold a dumbbell in each hand and sit on the edge of a bench. Keeping your lower back flat, lean forward. Explosively straighten your body and shrug the weights so your arms rise. Allow the momentum to flip your wrists so you catch the weights at shoulder level.

Hold a dumbbell in each hand and sit on the edge of a bench. Keeping your lower back flat, lean forward. Explosively straighten your body and shrug the weights so your arms rise. Allow the momentum to flip your wrists so you catch the weights at shoulder level.

6. Trap Raise
Set a bench to a low incline and lie chest-down with a dumbbell in each hand and your palms facing. Retract your shoulder blades, then raise the weights straight out so your arms are parallel to the floor.

Set a bench to a low incline and lie chest-down with a dumbbell in each hand and your palms facing. Retract your shoulder blades, then raise the weights straight out so your arms are parallel to the floor.

7. Clean and Press
Stand with feet shoulder width. Keeping your lower back arched, bend your hips back to lower your torso and grasp the bar with hands shoulder width. Extend your hips to lift the bar off the floor. When it gets past your knees, jump and shrug the bar so that momentum raises it and you catch it at shoulder level. Brace your abs and stand tall. Press the bar straight overhead.

Stand with feet shoulder width. Keeping your lower back arched, bend your hips back to lower your torso and grasp the bar with hands shoulder width. Extend your hips to lift the bar off the floor. When it gets past your knees, jump and shrug the bar so that momentum raises it and you catch it at shoulder level. Brace your abs and stand tall. Press the bar straight overhead.

8. Snatch-Grip High Pull
Set up as you did for the clean and press, but grasp the bar with hands double shoulder width. Explode the bar upward until it’s at chest level and your upper arms are parallel to the floor. Try to push your chest out as you lift the bar and contract your upper back completely.
Set up as you did for the clean and press, but grasp the bar with hands double shoulder width. Explode the bar upward until it’s at chest level and your upper arms are parallel to the floor. Try to push your chest out as you lift the bar and contract your upper back completely.

9. Band Lateral Raise
Step on the free end of each band with the opposite foot so the bands form an X in front of your body. Raise your arms 90 degrees out to the sides until your upper arms are parallel to the floor.

Step on the free end of each band with the opposite foot so the bands form an X in front of your body. Raise your arms 90 degrees out to the sides until your upper arms are parallel to the floor.

10. Band Front Raise
Stand on bands and hold the opposite ends. Raise your arms in front of your body to shoulder height.

Stand on bands and hold the opposite ends. Raise your arms in front of your body to shoulder height.

11. Band Bent-Over Lateral Raise
Stand on the end of one band with your right foot and hold it with your left hand. Do the opposite with another band so that the bands cross each other. Bend your hips back until your torso is almost parallel to the floor. The bands should be taut in this starting position. Squeeze your shoulder blades together and raise your arms out to your sides.

Stand on the end of one band with your right foot and hold it with your left hand. Do the opposite with another band so that the bands cross each other. Bend your hips back until your torso is almost parallel to the floor. The bands should be taut in this starting position. Squeeze your shoulder blades together and raise your arms out to your sides.

12. Band W Raise
Attach bands to a sturdy object at shoulder level and hold the opposite ends in each hand. Stand back to put tension on the bands. Squeeze your shoulder blades together and row the bands to your shoulders with elbows flared out so your upper arms make a W shape. Hold for two seconds.

Attach bands to a sturdy object at shoulder level and hold the opposite ends in each hand. Stand back to put tension on the bands. Squeeze your shoulder blades together and row the bands to your shoulders with elbows flared out so your upper arms make a W shape. Hold for two seconds.

13. Suspension Trainer Pike Pushup
Attach the suspension trainer to a sturdy object overhead, and lower the foot cradles to about knee height (you want your body to be in a straight line when you rest your feet in them). Get into a pushup position with your feet in the cradles and hands placed shoulder width on the floor. Keeping your abs braced, lower your body until your chest is just above the floor, and then push back up. Now bend your hips and raise them into the air until your torso is vertical. Straighten your body again. That’s one rep.

Attach the suspension trainer to a sturdy object overhead, and lower the foot cradles to about knee height (you want your body to be in a straight line when you rest your feet in them). Get into a pushup position with your feet in the cradles and hands placed shoulder width on the floor. Keeping your abs braced, lower your body until your chest is just above the floor, and then push back up. Now bend your hips and raise them into the air until your torso is vertical. Straighten your body again. That’s one rep.

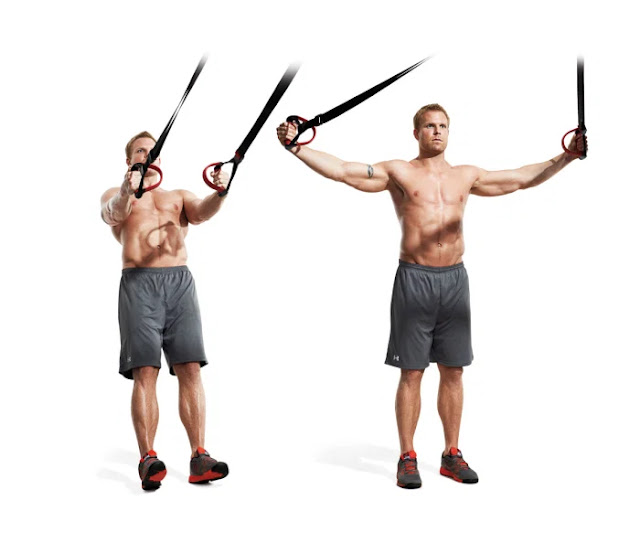
14. Suspension Trainer Y-Raise
Grasp the handles and stand with feet about shoulder width. Lean back 45–60 degrees, so your body is supported by the suspension trainer, and brace your abs. Raise your arms up and out into a Y shape with palms facing forward. Your body will become more vertical, but don’t allow your shoulders to lose tension at the top of the movement. Your weight will shift from the back foot to the front foot.

Grasp the handles and stand with feet about shoulder width. Lean back 45–60 degrees, so your body is supported by the suspension trainer, and brace your abs. Raise your arms up and out into a Y shape with palms facing forward. Your body will become more vertical, but don’t allow your shoulders to lose tension at the top of the movement. Your weight will shift from the back foot to the front foot.

15. Suspension Trainer Rear-Delt Raise
Shorten the length of the handles, but stand as you did for the Y raise. Open your arms out to your sides with palms facing in until your shoulder blades are squeezed together. Allow a little bend in your elbows.
Shorten the length of the handles, but stand as you did for the Y raise. Open your arms out to your sides with palms facing in until your shoulder blades are squeezed together. Allow a little bend in your elbows.

16. Hindu Pushup
Get into pushup position. Push your hands into the floor to drive your weight back so your hips rise into the air. Your back should be straight and your head behind your hands. Lower your body in an arcing motion so that your chest scoops downward and nearly scrapes the floor. Continue moving forward as you press your body up so your torso is vertical and your legs are straight and nearly on the floor. That’s one rep.

Get into pushup position. Push your hands into the floor to drive your weight back so your hips rise into the air. Your back should be straight and your head behind your hands. Lower your body in an arcing motion so that your chest scoops downward and nearly scrapes the floor. Continue moving forward as you press your body up so your torso is vertical and your legs are straight and nearly on the floor. That’s one rep.

17. Pike Press
Get into a pushup position and push your hips back so your torso is nearly vertical. Your hands, arms, and head should be in a straight line. Lower your body until your head nearly touches the floor between your hands and then press back up.

Get into a pushup position and push your hips back so your torso is nearly vertical. Your hands, arms, and head should be in a straight line. Lower your body until your head nearly touches the floor between your hands and then press back up.

18. Dip
Rest the palms of your hands on a bench or chair, and, if available, place your heels on another elevated object in front of you so your legs are suspended. Lower your body until your upper arms are parallel to the floor.

Rest the palms of your hands on a bench or chair, and, if available, place your heels on another elevated object in front of you so your legs are suspended. Lower your body until your upper arms are parallel to the floor.

19. Lateral Plank Walk
Get into a pushup position and simultaneously move your left hand over your right while your right leg steps out wide. Now bring the right hand out and walk your left foot into a normal pushup footing. That’s one shuffle. Continue “walking” for 10 shuffles and then walk in the opposite direction to get back to the starting position. Keep your core braced and your hips level at all times.

Get into a pushup position and simultaneously move your left hand over your right while your right leg steps out wide. Now bring the right hand out and walk your left foot into a normal pushup footing. That’s one shuffle. Continue “walking” for 10 shuffles and then walk in the opposite direction to get back to the starting position. Keep your core braced and your hips level at all times.

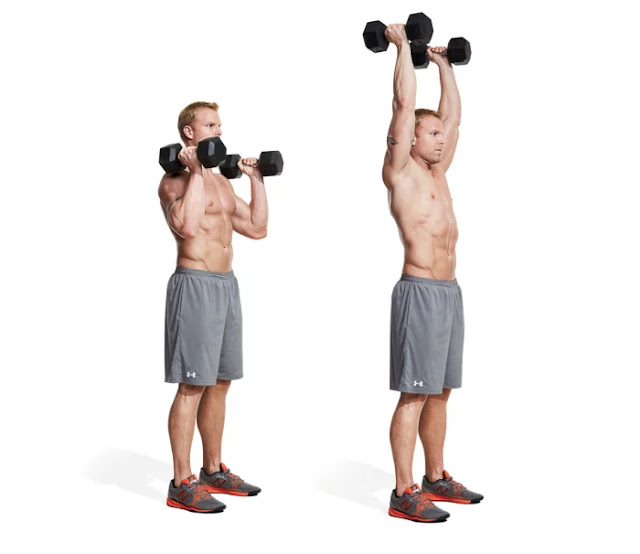
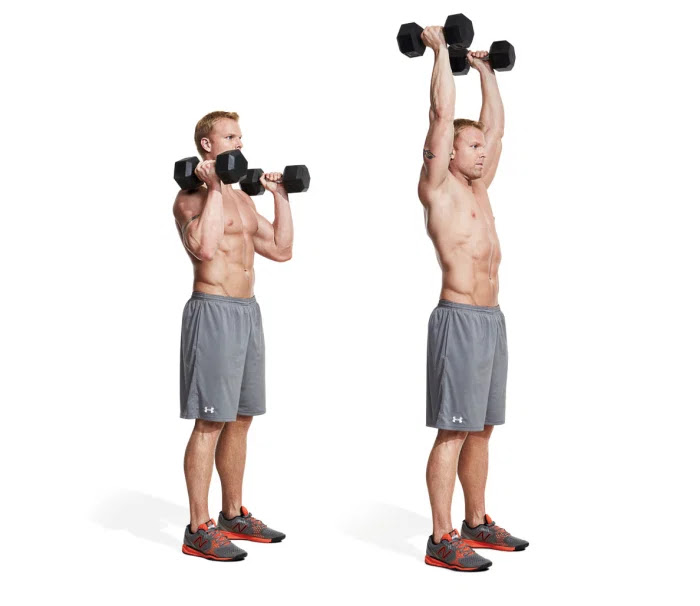
20. Dumbbell Neutral Grip Overhead Press
Hold a dumbbell in each hand at shoulder level with palms facing each other and elbows pointing forward. Brace your core and press the weights straight overhead. At the top, shrug your shoulders and hold for a second.
Hold a dumbbell in each hand at shoulder level with palms facing each other and elbows pointing forward. Brace your core and press the weights straight overhead. At the top, shrug your shoulders and hold for a second.
21. Dumbbell Raise Complex
Hold dumbbells at your sides with palms facing you. Raise the weights up in front of you to shoulder level with thumbs pointing up. Complete 12–15 reps and then raise the weights out to your sides 90 degrees (bend your elbows a bit as you lift). Complete your reps and then switch to a lighter pair of dumbbells. Raise them out to your sides and up to ear level with straight arms and thumbs pointing up. Hold this position for 30 seconds. Squeeze your glutes to help support you.

Hold dumbbells at your sides with palms facing you. Raise the weights up in front of you to shoulder level with thumbs pointing up. Complete 12–15 reps and then raise the weights out to your sides 90 degrees (bend your elbows a bit as you lift). Complete your reps and then switch to a lighter pair of dumbbells. Raise them out to your sides and up to ear level with straight arms and thumbs pointing up. Hold this position for 30 seconds. Squeeze your glutes to help support you.

22. Snatch-Grip Low Pull
Set up as you did for the high pull, but when you jump, perform an explosive shrug and bend your elbows to pull the bar into your belly. Do not continue to lift the bar up to chest level.

Set up as you did for the high pull, but when you jump, perform an explosive shrug and bend your elbows to pull the bar into your belly. Do not continue to lift the bar up to chest level.

23. Snatch-Grip Shrug Pull
This is done the same as the low-pull, but keep your elbows straight and perform an explosive shrug once the bar passes your knees.

This is done the same as the low-pull, but keep your elbows straight and perform an explosive shrug once the bar passes your knees.
24. Rack Deadlift
Set up the bar on some mats, boxes, or the safety rods of a power rack so that it rests just below your knees. Stand with feet hip-width and, keeping your lower back in its natural arch, bend your hips back and grasp the bar just outside your knees. Pulling the bar into your body tightly, extend your hips and stand up.

Set up the bar on some mats, boxes, or the safety rods of a power rack so that it rests just below your knees. Stand with feet hip-width and, keeping your lower back in its natural arch, bend your hips back and grasp the bar just outside your knees. Pulling the bar into your body tightly, extend your hips and stand up.

25. Farmer's Walk
Pick up the heaviest set of dumbbells you can handle and walk. Squeeze the handles hard and walk with your chest out and shoulders back. If you don’t have the space to walk in a straight line, walk in a figure-eight pattern.

Pick up the heaviest set of dumbbells you can handle and walk. Squeeze the handles hard and walk with your chest out and shoulders back. If you don’t have the space to walk in a straight line, walk in a figure-eight pattern.

26. Dumbbell Deadlift/Shrug Combo
Hold dumbbells at your sides and stand with feet shoulder width. Bend your hips back to squat down until the weights are knee level. Now explode upward and shrug hard at the top. Reset your feet before beginning the next rep.

Hold dumbbells at your sides and stand with feet shoulder width. Bend your hips back to squat down until the weights are knee level. Now explode upward and shrug hard at the top. Reset your feet before beginning the next rep.

27. Dumbbell Bent-Over Lateral Raise
Hold a dumbbell in each hand and, keeping your lower back in its natural arch, bend your hips back until your torso is about parallel to the floor. Allow your arms to hang. Now squeeze your shoulder blades together and raise your arms out 90 degrees, with thumbs pointing up, until your upper arms are parallel to the floor.
Hold a dumbbell in each hand and, keeping your lower back in its natural arch, bend your hips back until your torso is about parallel to the floor. Allow your arms to hang. Now squeeze your shoulder blades together and raise your arms out 90 degrees, with thumbs pointing up, until your upper arms are parallel to the floor.
28. Incline Bench Press
Set an adjustable bench to a 30- to a 45-degree angle and lie back on it. Grasp the bar just outside shoulder width, arch your back, and pull it off the rack. Lower the bar to the upper part of your chest and then drive your feet into the floor as you press it back up.

Set an adjustable bench to a 30- to a 45-degree angle and lie back on it. Grasp the bar just outside shoulder width, arch your back, and pull it off the rack. Lower the bar to the upper part of your chest and then drive your feet into the floor as you press it back up.

29. Machine Shoulder Press
Adjust the seat of a shoulder press machine so that the handles are at shoulder level. If you have shoulder problems, and if your machine allows it, grasp the handles so your palms face each other. Otherwise, grasp them with palms facing forward as normal. Make sure your elbows track in a normal pressing path as you press the handles overhead.

Adjust the seat of a shoulder press machine so that the handles are at shoulder level. If you have shoulder problems, and if your machine allows it, grasp the handles so your palms face each other. Otherwise, grasp them with palms facing forward as normal. Make sure your elbows track in a normal pressing path as you press the handles overhead.

30. Bent-Over Reverse Flye
Set up as you did for the neutral-grip row but with lighter dumbbells. Raise your arms out to your sides 90 degrees, squeezing your shoulder blades together at the top for a second. Complete your set and then rest until the end of three minutes, when your timer goes off.

Set up as you did for the neutral-grip row but with lighter dumbbells. Raise your arms out to your sides 90 degrees, squeezing your shoulder blades together at the top for a second. Complete your set and then rest until the end of three minutes, when your timer goes off.


 The
movement is versatile, too. "You can program this as a primary or
accessory movement or add as a superset exercise," Shannon continues.
"Depending on the weight and readiness of the athlete, avoid keeping
moderate to heavy lifts under ten reps. Being bent over moving the
weight can put added pressure on the lower back, especially if we are
already, or begin to, fatigue."
The
movement is versatile, too. "You can program this as a primary or
accessory movement or add as a superset exercise," Shannon continues.
"Depending on the weight and readiness of the athlete, avoid keeping
moderate to heavy lifts under ten reps. Being bent over moving the
weight can put added pressure on the lower back, especially if we are
already, or begin to, fatigue."