Wednesday, 28 April 2021

Best Shoulder Exercises for Men

1. Barbell Overhead Press

Set the bar up in a squat rack or cage, and grasp it just outside shoulder width. Take the bar off the rack and hold it at shoulder level with your forearms perpendicular to the floor. Squeeze the bar and brace your abs. Press the bar overhead, pushing your head forward and shrugging your traps as the bar passes your face.


2. Standing Dumbbell Fly

Hold a dumbbell in each hand by your sides. Without shrugging, use your upper body to swing the weights up a few inches. Your arms and torso will form an upside-down V shape. Think of it as a lateral raise with momentum but without full range of motion.

3. Face Pull

Attach a rope handle to the top pulley of a cable station. Grasp an end in each hand with palms facing each other. Step back to place tension on the cable. Pull the handles to your forehead so your palms face your ears and your upper back is fully contracted.


4. High Pull

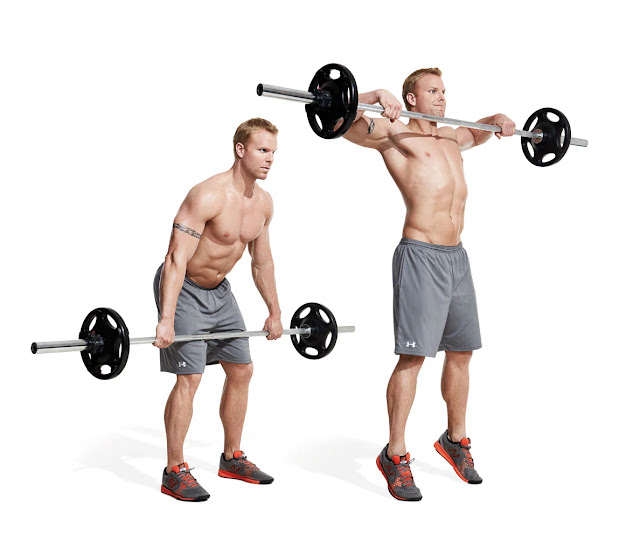
Grasp the bar with hands about double shoulder width and hold it in front of your thighs. Bend your knees and hips so the bar hangs just above your knees. Explosively extend your hips as if jumping and pull the bar up to shoulder level with elbows wide apart, as in an upright row.

5. Seated Dumbbell Clean

Hold a dumbbell in each hand and sit on the edge of a bench. Keeping your lower back flat, lean forward. Explosively straighten your body and shrug the weights so your arms rise. Allow the momentum to flip your wrists so you catch the weights at shoulder level.

6. Trap Raise

Set a bench to a low incline and lie chest-down with a dumbbell in each hand and your palms facing. Retract your shoulder blades, then raise the weights straight out so your arms are parallel to the floor.


7. Clean and Press

Stand with feet shoulder width. Keeping your lower back arched, bend your hips back to lower your torso and grasp the bar with hands shoulder width. Extend your hips to lift the bar off the floor. When it gets past your knees, jump and shrug the bar so that momentum raises it and you catch it at shoulder level. Brace your abs and stand tall. Press the bar straight overhead.


8. Snatch-Grip High Pull

Set up as you did for the clean and press, but grasp the bar with hands double shoulder width. Explode the bar upward until it’s at chest level and your upper arms are parallel to the floor. Try to push your chest out as you lift the bar and contract your upper back completely.


9. Band Lateral Raise

Step on the free end of each band with the opposite foot so the bands form an X in front of your body. Raise your arms 90 degrees out to the sides until your upper arms are parallel to the floor.


10. Band Front Raise

Stand on bands and hold the opposite ends. Raise your arms in front of your body to shoulder height.


11. Band Bent-Over Lateral Raise

Stand on the end of one band with your right foot and hold it with your left hand. Do the opposite with another band so that the bands cross each other. Bend your hips back until your torso is almost parallel to the floor. The bands should be taut in this starting position. Squeeze your shoulder blades together and raise your arms out to your sides.


12. Band W Raise

Attach bands to a sturdy object at shoulder level and hold the opposite ends in each hand. Stand back to put tension on the bands. Squeeze your shoulder blades together and row the bands to your shoulders with elbows flared out so your upper arms make a W shape. Hold for two seconds.


13. Suspension Trainer Pike Pushup

Attach the suspension trainer to a sturdy object overhead, and lower the foot cradles to about knee height (you want your body to be in a straight line when you rest your feet in them). Get into a pushup position with your feet in the cradles and hands placed shoulder width on the floor. Keeping your abs braced, lower your body until your chest is just above the floor, and then push back up. Now bend your hips and raise them into the air until your torso is vertical. Straighten your body again. That’s one rep.


14. Suspension Trainer Y-Raise

Grasp the handles and stand with feet about shoulder width. Lean back 45–60 degrees, so your body is supported by the suspension trainer, and brace your abs. Raise your arms up and out into a Y shape with palms facing forward. Your body will become more vertical, but don’t allow your shoulders to lose tension at the top of the movement. Your weight will shift from the back foot to the front foot.


15. Suspension Trainer Rear-Delt Raise

Shorten the length of the handles, but stand as you did for the Y raise. Open your arms out to your sides with palms facing in until your shoulder blades are squeezed together. Allow a little bend in your elbows.


16. Hindu Pushup

Get into pushup position. Push your hands into the floor to drive your weight back so your hips rise into the air. Your back should be straight and your head behind your hands. Lower your body in an arcing motion so that your chest scoops downward and nearly scrapes the floor. Continue moving forward as you press your body up so your torso is vertical and your legs are straight and nearly on the floor. That’s one rep.


17. Pike Press

Get into a pushup position and push your hips back so your torso is nearly vertical. Your hands, arms, and head should be in a straight line. Lower your body until your head nearly touches the floor between your hands and then press back up.


18. Dip

Rest the palms of your hands on a bench or chair, and, if available, place your heels on another elevated object in front of you so your legs are suspended. Lower your body until your upper arms are parallel to the floor.


19. Lateral Plank Walk

Get into a pushup position and simultaneously move your left hand over your right while your right leg steps out wide. Now bring the right hand out and walk your left foot into a normal pushup footing. That’s one shuffle. Continue “walking” for 10 shuffles and then walk in the opposite direction to get back to the starting position. Keep your core braced and your hips level at all times.


20. Dumbbell Neutral Grip Overhead Press

Hold a dumbbell in each hand at shoulder level with palms facing each other and elbows pointing forward. Brace your core and press the weights straight overhead. At the top, shrug your shoulders and hold for a second.


21. Dumbbell Raise Complex

Hold dumbbells at your sides with palms facing you. Raise the weights up in front of you to shoulder level with thumbs pointing up. Complete 12–15 reps and then raise the weights out to your sides 90 degrees (bend your elbows a bit as you lift). Complete your reps and then switch to a lighter pair of dumbbells. Raise them out to your sides and up to ear level with straight arms and thumbs pointing up. Hold this position for 30 seconds. Squeeze your glutes to help support you.


22. Snatch-Grip Low Pull

Set up as you did for the high pull, but when you jump, perform an explosive shrug and bend your elbows to pull the bar into your belly. Do not continue to lift the bar up to chest level.


23. Snatch-Grip Shrug Pull

This is done the same as the low-pull, but keep your elbows straight and perform an explosive shrug once the bar passes your knees.


24. Rack Deadlift

Set up the bar on some mats, boxes, or the safety rods of a power rack so that it rests just below your knees. Stand with feet hip-width and, keeping your lower back in its natural arch, bend your hips back and grasp the bar just outside your knees. Pulling the bar into your body tightly, extend your hips and stand up.


25. Farmer's Walk

Pick up the heaviest set of dumbbells you can handle and walk. Squeeze the handles hard and walk with your chest out and shoulders back. If you don’t have the space to walk in a straight line, walk in a figure-eight pattern.


26. Dumbbell Deadlift/Shrug Combo

Hold dumbbells at your sides and stand with feet shoulder width. Bend your hips back to squat down until the weights are knee level. Now explode upward and shrug hard at the top. Reset your feet before beginning the next rep.


27. Dumbbell Bent-Over Lateral Raise

Hold a dumbbell in each hand and, keeping your lower back in its natural arch, bend your hips back until your torso is about parallel to the floor. Allow your arms to hang. Now squeeze your shoulder blades together and raise your arms out 90 degrees, with thumbs pointing up, until your upper arms are parallel to the floor.

28. Incline Bench Press

Set an adjustable bench to a 30- to a 45-degree angle and lie back on it. Grasp the bar just outside shoulder width, arch your back, and pull it off the rack. Lower the bar to the upper part of your chest and then drive your feet into the floor as you press it back up.


29. Machine Shoulder Press

Adjust the seat of a shoulder press machine so that the handles are at shoulder level. If you have shoulder problems, and if your machine allows it, grasp the handles so your palms face each other. Otherwise, grasp them with palms facing forward as normal. Make sure your elbows track in a normal pressing path as you press the handles overhead.


30. Bent-Over Reverse Flye

Set up as you did for the neutral-grip row but with lighter dumbbells. Raise your arms out to your sides 90 degrees, squeezing your shoulder blades together at the top for a second. Complete your set and then rest until the end of three minutes, when your timer goes off.


 CONCLUSION 


Saturday, 14 November 2020

The Top 10 Lat Moves to Build a Perfect Back

  The Top 10 Lat Moves to Build a Perfect Back:

athlete doing push ups in gym
https://keranfitness.blogspot.com/


When you think of the glamour body parts to train in the gym, you often think first of the so-called “mirror muscles.” These are the muscles that every guy loves to train, and the ones that you can always see easily—chest, arms, abs, and shoulders.

But if you really want to that perfect superhero physique, you have to build a ripped and chiseled back, too. Specifically, you have to hit your lats, the wide, fan-shaped muscles that loom large along your back. The perfect physique doesn’t really come together without a muscular back that tapers in width from shoulders to waist. And that taper is really a product of lat development.

Training your lats, however, feels boring to some and daunting to others, because sometimes, we think of pull-ups as our only option. But there are a host of exercises that can get the job done. Here are 10 moves that will really develop your lats. Make sure you’re hitting two or three of these moves at least once a week to round out your physique.

A Quick Lats Anatomy Lesson

In order to work your lats you have to understand them at least a little: They’re the large, triangle-shaped muscles on the back, creating a thick taper from shoulder to waist. The muscle inserts into the upper part of the humerus, your upper arm bone, from the inside. Their purpose is main two-fold: Your lats primarily work when you pull things, and when you adduct things. What’s adduction? Raise your arms out to your sides, forming a “T” with your torso. Now lower them forcefully back to your sides. That forceful lowering action is adduction.

This all means that traditional rowing motions with your arms by your sides pulling straight back will impact your lats. Get too wide with your grip on a row though, and you begin to see more involvement from the rear deltoid and middle traps. Researchers have also found there could be some mild advantages from pulling with a medium grip width specifically in the vertical plane. In both the upward and downward path of the movement there were some small advantages from a muscular recruitment standpoint the the medium grip which seemed to be just right.

The 10 Best Lats Exercises:

Deadlifts

barbell deadlift
MEN'S HEALTH

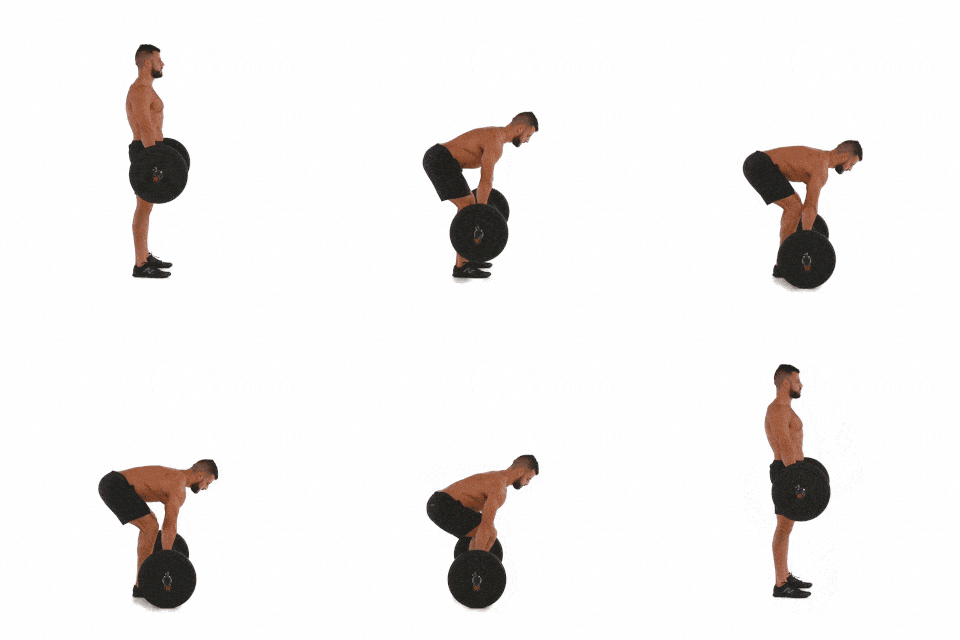
The classic barbell deadlift is often thought of as a hamstring and glute developer, but it’ll smoke your lats too. Think about it: Whether you’re lifting or lowering that barbell with a heavy weight, it’s hanging from your arms, and your back muscles have to pull. Don’t underrate this move as a foundation of a solid back.

How to: Load a barbell with weight on the ground and stand close to it, so it nearly touches your shins. Grasp it with an overhand, slightly-wider-than-shoulder-width grip. With feet shoulder-width apart and arms just outside of the legs, push the hips back as far as possible then bend the knee far enough to reach the bar. From the bottom position with a tall spine, pull the bar from the ground by standing tall and pulling the hips back to your standing position. Throughout the movement, it's important to maintain a strong posture. 

Barbell Row

Bent-over Barbell Row
MEN'S HEALTH

Fixed moves with both arms can maximize the amount of weight that can move. This move is a staple in most bodybuilders, athletes, and probably your routine by this point.

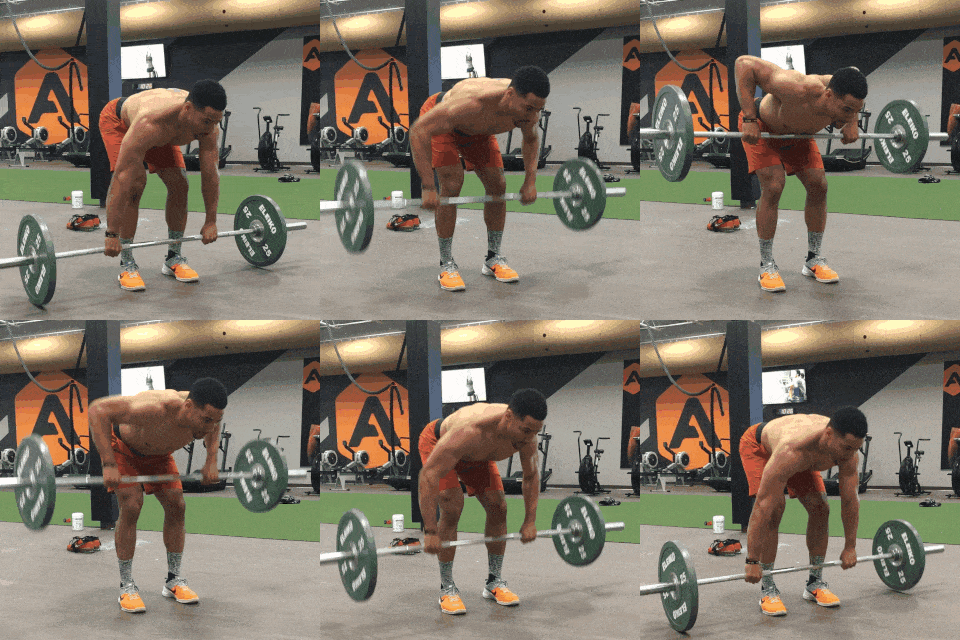
The great thing about the barbell row is, due to required stability in the spine and core muscles (keeping a neutral spine) and isometric hamstring activity (hinging the hips in a bent position), the action becomes a global pull exercise," says athlete performance and development specialist https://keranfitness.blogspot.com/"I personally love programming this exercise due to all the benefits the rows have on the posterior chain, as well as the added benefits of improvement of strength and hypertrophy."

single arm rowThe movement is versatile, too. "You can program this as a primary or accessory movement or add as a superset exercise," Shannon continues. "Depending on the weight and readiness of the athlete, avoid keeping moderate to heavy lifts under ten reps. Being bent over moving the weight can put added pressure on the lower back, especially if we are already, or begin to, fatigue."

How to: Stand next to a loaded barbell set on the ground. Bend your knees slightly and hinge forward so your torso is slightly higher than parallel to the ground, then grab the barbell using an overhand, shoulder-width grip. Look down, not forward. Tighten your core. Hinge upwards, raising your torso to a 45-degree angle with the ground and lifting the barbell. This is the starting position.

Keeping your core tight and your shoulder blades squeezed, bend your elbows and pull the barbell to your lower chest. Aim to keep your elbows at a 45-degree angle relative to your torso as you do this, and try to touch the bar to your ribcage. Lower to the start with control. That's 1 rep.

Dumbbell Row:

A
MEN'S HEALTH

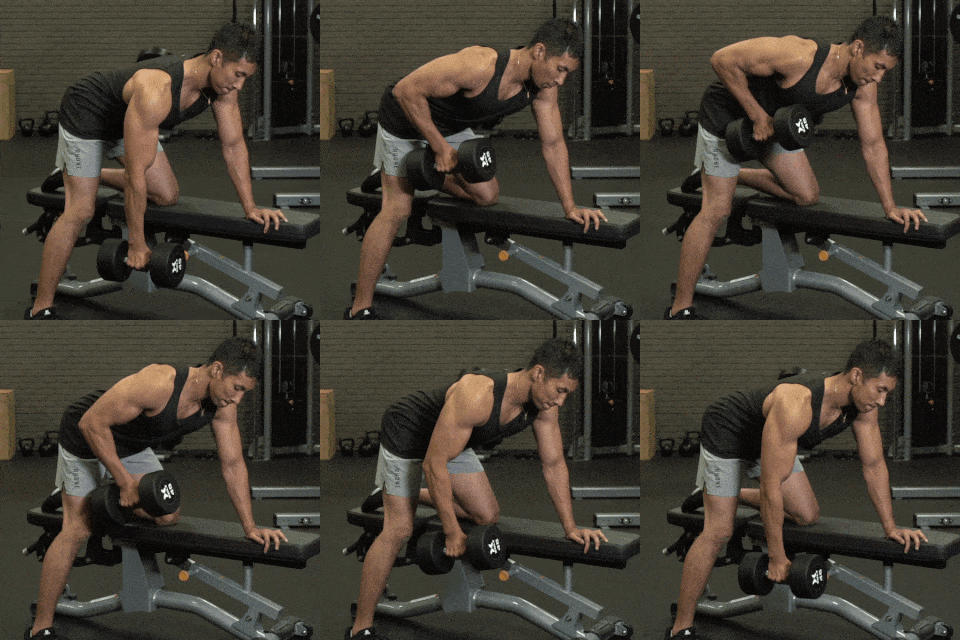
This is one of the first variations novice lifters learn. You simply hinge forward, place one arm on a bench or rack for balance, and grasp a dumbbell in the other arm. Keep your torso steady as you bend your elbow and use your back muscles to pull the dumbbell up toward your ribcage. Dumbbell rows involve a host of back muscles, but if you want to focus on your lats here, aim to get a good stretch at the bottom of the motion.

How to: Start standing, holding a single dumbbell in your right hand. Now hinge forward until your torso is nearly parallel with the ground. Keep your core tight and your feet shoulder-width apart as you do this. Place your left hand on a box or bench for balance. This is the start. Pull the dumbbell back to just above your belly button, then slowly return it back to the start.

Pullups and Chinups

Pullup
https://keranfitness.blogspot.com/

The pull-up and the chin-up are well-known moves, and staples for lat development. Both moves are simple: You hang from a bar, with an overhand grip (pull-ups) or an underhand grip (chin-ups), and pull your chest to the bar. To really hit your lats, avoid the so-called “kip,” a Crossfit idea that has you explosively swinging your hips to create momentum that drives your chest to the bar. Work up to 3 sets of 10.

How to: Hang from a pull-up bar with an overhand (pull-up) or underhand (chin-up) grip, hands about shoulder-width apart. Keeping your core tight, bend at the elbows and shoulders and pull your chest to the bar. Pause, then lower with control.

Lat Pulldowns

Beginner's Guide: Get More From Your Lat Pulldown
by Men's Health US

The lat pulldown is a cousin of pullups and chinups, and it definitely seems similar. But we’re giving it its own spot here because of how it lets you focus in on your lats. Freed of grip concerns and the need to manage your lower body perfectly, you can really focus in on your lats and finish off every rep with a good squeeze.

Be strategic once you start adding the pulldown to your workouts. "This exercise can be programmed as a superset to an upper body push exercise," says Shannon "It can be programmed as a progressive exercise to help advance to wide grip pull ups. And lastly, used as an activation exercise to help get the lat muscles 'firing'."

How to: Sit in a lat pulldown station and grab the bar above with a grip slightly wider than shoulder-width. Tighten your core and keep your torso upright. Pull the bar down toward your chest, bending at your elbows and squeezing your shoulder blades. Slowly return the bar to the top of the station.

"The key to getting the biggest 'bang for your buck' is keeping your torso not completely erect, but at about a 60 percent angle," says Shannon. "As well as focusing on tempo and control to get that concentric (lowering the bar) and eccentric (raising the bar) effect."

You can also try a kneeling variation, shown in the video above.

Landmine Row

This content is imported from YouTube. You may be able to find the same content in another format, or you may be able to find more information, at their web site.

The landmine row has a lot in common with the barbell row, except the angle of your pull is slightly different. The landmine row, with the barbell anchored behind you, lets you get more of a squeeze with your lats. And because it’s anchored, you cheat less and squeeze a little bit more.

How to: Set a barbell in a landmine and place some weight on the opposite end of the barbell. Wrap a V-bar handle around the weighted end and grasp its handles. Hinge forward so your torso is at a 45-degree angle with the ground; this is the start. Squeeze your shoulder blades and row the weighted end of the barbell toward your chest; pause, then return to the start.

Dumbbell Pullover

The Dumbbell Pullover
by Men's Health US

The dumbbell pullover is viewed as a chest exercise by some, and it’ll hit your abs considerably too. But as you pull the weight back above your torso, your upper arms mimic a row motion. And the best part comes before that: your lats wind up getting a great stretch as you lower the weight.

How to: Lie with your back on a bench, holding a single dumbbell overhead with both hands, gripping the weight instead of the bar. Keep your arms straight as you lower the weight in an arc behind your head. Once you feel a stretch in your chest, pause, then pull it back to the starting position. As you pull it back, your lats come into play, driving the motion. Think 3 sets of 8 to 10 reps here.

Meadows Row

This content is imported from YouTube. You may be able to find the same content in another format, or you may be able to find more information, at their web site.
ADVERTISEMENT - CONTINUE READING BELOW

The brainchild of bodybuilder John Meadows, the Meadows row has you approaching the landmine from a different angle for a vicious single-arm row. The angle forces the resistance to travel both up and away, challenging you to pull explosively near the top.

How to: Stand next to a landmine, facing away, your outside leg about 6 inches from the end of the barbell and your back leg in a staggered stance behind you. Hinge forward so your torso is at a 45-degree angle to the ground, and rest your outside hand on your outside leg. Grip the bar with an overhand grip with your inside hand. Tighten your core. This is the start. Now row the bar to the bottom of your chest. Squeeze. Lower with control.

Renegade Row

How To Perfect Your Renegade Row | Form Check
by Men's Health US

This CrossFit staple lets you train your lats while building shoulder stability at the same time. It’ll also challenge your core. You’ll find yourself using lighter weights than you might on other motions, too, which means you’ll have a good opportunity to finish each rep with a squeeze. Just sit this one out if you have shoulder issues.

How to: Get in pushup position, with your hands on a pair of dumbbells in a neutral grip, and your feet about shoulder-width apart. Do a pushup. As you raise your torso, lift one dumbbell off the ground and row it toward your belly button; you’ll need to support your weight with your other shoulder. Return to the pushup position, then lift and row the other dumbbell. Alternate the first dumbbell you row with during every pushup rep.

Inverted Bodyweight Row

How to Master the Inverted Bodyweight Row | Form Check
by Men's Health US


This row has you lying underneath a bar, tightening your entire torso, then rowing your chest to the bar. It’ll challenge your abs and glutes, but expect it to be hard. The good news: It’s an incredibly scale-able bodyweight move: Make it easier by raising the bar higher and assuming a position closer to standing. Or make it easier by bending your knees and planting your heels into the floor (instead of maintaining a fully straight line from shoulders through feet).

How to: Lie under a barbell or Smith machine and grab the bar with an underhand grip slightly wider than shoulder-width. Position your feet and torso so that you’re at a 45-degree angle with the ground. Squeeze your shoulder blades; this is the start. Now pull your torso and body upwards, aiming to touch the bar between belly button and chest. Lower back to the start. That’s 1 rep.

Deadstop Row:

The deadstop row is similar to the barbell row, except after each rep, you lower the bar all the way to the ground, bringing it to a dead stop. This gives you a chance to reset your form and tighten your core, and if you struggle with grip strength on the barbell row, it gives your forearms a break. The result: You move more weight, but without sacrificing form or risking injury.

How to: Setup for this is very similar to a barbell row. Once again, you stand next to a loaded barbell set on the ground. Bend your knees slightly and hinge forward so your torso is slightly higher than parallel to the ground, then grab the barbell using an overhand, shoulder-width grip. Look down, not forward. Tighten your core, and make sure your hips are slightly lower than your shoulders. This is the start. Keeping your core tight and your shoulder blades squeezed, bend your elbows and pull the barbell to your lower chest. Aim to keep your elbows at a 45-degree angle relative to your torso as you do this, and try to touch the bar to your ribcage. Lower the barbell all the way to the ground, and let it come to rest (a dead stop) on the ground, then begin the next rep.